A worn control arm can transform a smooth-driving vehicle into a clunking, wandering safety hazard. The symptoms are unmistakable: thumping noises over bumps, vague steering, uneven tire wear, and a general feeling of instability. While control arm replacement may sound like a job reserved for professional mechanics, it is a task that many experienced DIYers can tackle with the right tools, preparation, and guidance.
This guide provides a step-by-step walkthrough of the control arm replacement process, covering lower control arms, sway bar links, mounting bolts, ball joints, and upper control arm installation. Before beginning, ensure you have a safe workspace, proper safety equipment (jack stands are essential—never rely on a jack alone), and the correct replacement parts for your specific vehicle.
1. How To Replace The Lower Control Arm?
The lower control arm is the primary link between your vehicle's chassis and the wheel hub. It bears significant loads and is the most frequently replaced control arm in both front and rear suspension systems. Here is how to replace it.
Tools and Materials You Will Need:
Floor jack and heavy-duty jack stands
Lug wrench
Socket set (metric and standard, depending on vehicle)
Breaker bar or impact wrench
Torque wrench
Ball joint separator or pickle fork
Penetrating oil (e.g., WD-40 or PB Blaster)
Hammer
Replacement lower control arm assembly
New mounting bolts and nuts (recommended, not always included)
Step-by-Step Procedure:
Prepare the Vehicle: Park on a level surface and engage the parking brake. Loosen the lug nuts on the wheel corresponding to the control arm you are replacing. Do not remove them completely yet.
Lift and Support: Jack up the vehicle and place jack stands securely under the manufacturer-recommended lift points. Never work under a vehicle supported only by a jack. Remove the wheel and set it aside.
Apply Penetrating Oil: Spray all control arm mounting bolts, the ball joint nut, and any sway bar link nuts with penetrating oil. Allow it to soak for 10–15 minutes to ease removal.
Support the Suspension: Position a floor jack under the control arm or the steering knuckle (depending on your vehicle's design) and raise it slightly to take tension off the mounting bolts. This step is critical for safe bolt removal.
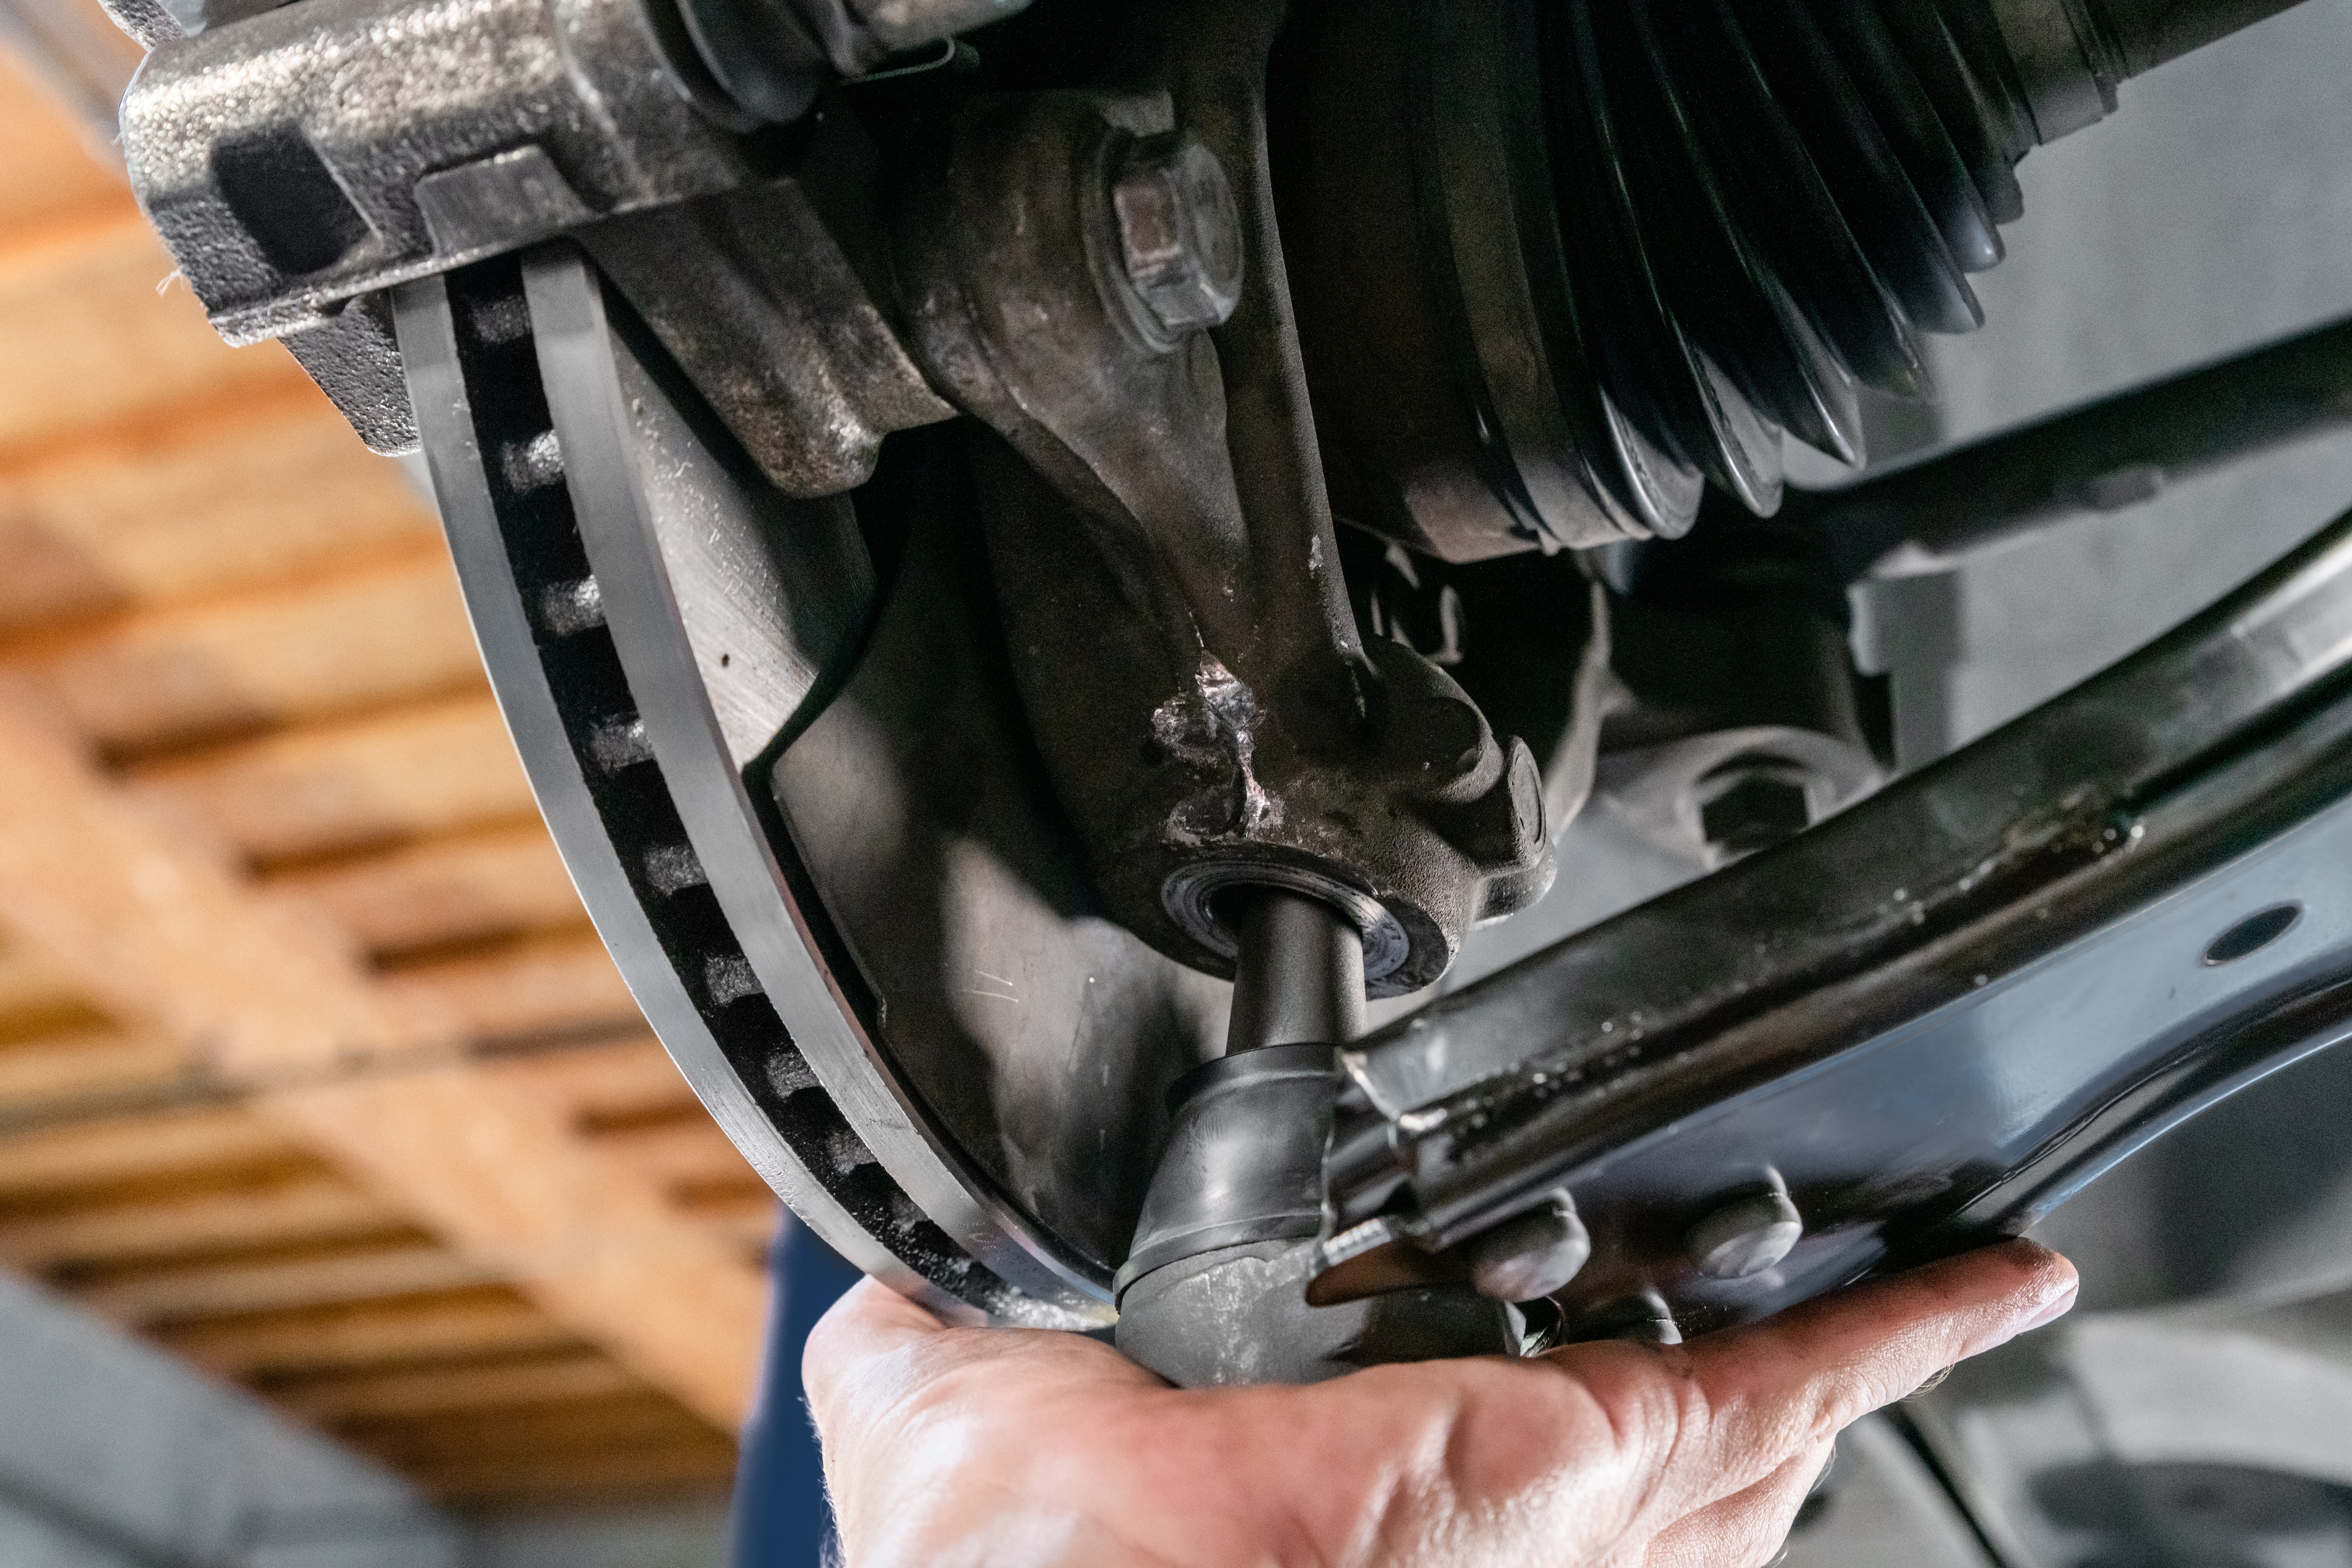
Remove the Ball Joint Nut: Locate the ball joint where the control arm connects to the steering knuckle. Remove the cotter pin (if present) and loosen the ball joint nut. Do not remove it completely yet.
2. Remove The Sway Bar or Stabilizer Bar Link
Before you can fully remove the lower control arm on many vehicles, you must detach the sway bar link (also known as the stabilizer bar link). This link connects the sway bar to the control arm or strut, and it will be under tension.
Procedure:
Locate the Sway Bar Link: The link is a vertical or angled rod with a ball joint or bushing at each end. One end attaches to the sway bar; the other attaches to the control arm or strut.
Hold the Stud: Many sway bar links have a flat spot or hex fitting to hold the stud while you loosen the nut. If you simply try to turn the nut, the entire stud may spin.
Remove the Nut: Use a wrench or socket to remove the nut from the sway bar link where it attaches to the control arm. If the link is rusted, penetrating oil and an impact wrench may be necessary.
Disconnect the Link: Once the nut is removed, the link should separate from the control arm. If the link is old or rusted, it may be damaged during removal—this is an ideal time to replace the sway bar links as well.
Set Aside: If you are reusing the existing sway bar link, set it aside carefully. If the link is damaged or worn, have a replacement ready for installation.
3. Remove The Control Arm Mounting Bolts
The control arm mounting bolts are the primary fasteners securing the control arm to the vehicle's subframe or chassis. These bolts are often large (typically 14mm to 21mm) and may be torqued to high specifications. Rust and corrosion can make removal challenging.
Detailed Procedure:
Identify All Mounting Points: Most lower control arms have two or three mounting points. Common configurations include:
A front bushing mount and a rear bushing mount (two-point design)
A front bushing, a rear bushing, and an additional mounting bracket (three-point design)
Mark Alignment Settings: If your vehicle uses eccentric bolts or alignment cams at the control arm mounting points, mark their positions with a paint pen or scribe. This provides a reference point for reassembly, though a professional alignment is still recommended after the job is complete.
Remove the Bolts: Using a breaker bar or impact wrench, loosen and remove the mounting bolts. On some vehicles, you may need to access the nut from the opposite side of the bolt. A second wrench or socket may be required to hold the nut while turning the bolt.
Handle Stuck Bolts: If a bolt is seized, apply additional penetrating oil and allow it to soak. Use a breaker bar for additional leverage. As a last resort, controlled heat from a propane torch can help break the bond, but exercise extreme caution near rubber bushings and fuel lines.
Remove the Control Arm: With all bolts removed, the control arm should be free. If it remains stuck, gently tap the mounting brackets with a hammer to break any corrosion seal.
4. Attach The Sway Bar Link And Ball Joint
With the new control arm in position and the mounting bolts hand-tightened, it is time to reconnect the sway bar link and ball joint. Proper installation at this stage ensures correct suspension geometry and prevents premature wear.
Reattaching the Sway Bar Link:
Position the Link: Insert the sway bar link stud through the mounting hole on the new control arm.
Install the Nut: Thread the nut onto the stud. If the link has a flat spot or hex fitting, use it to hold the stud while tightening.
Tighten to Specification: Tighten the sway bar link nut to the manufacturer's torque specification. Overtightening can damage the bushing or ball joint; undertightening allows play and noise.
Repeat for the Opposite End: If you disconnected both ends of the sway bar link, reattach the top end to the sway bar as well.
Reattaching the Ball Joint:
Guide the Stud: Carefully guide the ball joint stud into the tapered hole in the steering knuckle. The taper ensures a tight fit.
Thread the Nut: Hand-thread the ball joint nut onto the stud.
Tighten: Tighten the ball joint nut to the manufacturer's torque specification. This is typically a high torque value, so a torque wrench is essential.
Install Cotter Pin: If the ball joint uses a cotter pin, install it and bend the ends to secure the pin in place.
Critical Note: At this stage, the control arm mounting bolts should still be only hand-tight or loosely threaded. Full tightening of the mounting bolts should occur only when the vehicle is at its normal ride height—not while the suspension is hanging at full droop. Tightening with the suspension unloaded will preload the bushings, leading to premature failure and a harsh ride.
5. Upper Control Arm And How To Install It?
While many modern vehicles use a MacPherson strut design that eliminates the upper control arm, some vehicles—particularly trucks, SUVs, and older passenger cars—still feature a traditional double-wishbone suspension with both upper and lower control arms. If your vehicle has an upper control arm, here is how to install it.
Upper Control Arm Installation Procedure:
Lift and Support: As with the lower arm, lift the vehicle and secure it on jack stands. Remove the wheel for access.
Remove the Old Upper Control Arm:
Disconnect the upper ball joint from the steering knuckle.
Remove the mounting bolts securing the upper arm to the chassis.
On many vehicles, the upper control arm bolts also serve as the camber adjustment; mark their positions before removal.
Install the New Upper Control Arm:
Position the new upper control arm into place.
Install the mounting bolts, aligning any adjustment cams to their marked positions.
Hand-tighten the bolts initially—do not fully torque them yet.
Connect the Upper Ball Joint:
Guide the upper ball joint stud into the steering knuckle.
Thread and tighten the ball joint nut to manufacturer specifications.
Install a new cotter pin if required.
Final Torquing: As with the lower control arm, the upper control arm mounting bolts should be fully torqued only when the vehicle is at normal ride height. This often requires reinstalling the wheel, lowering the vehicle onto the ground (or onto jack stands positioned under the suspension), and then accessing the bolts for final tightening.
Upper vs. Lower Control Arm Notes:
| Feature | Lower Control Arm | Upper Control Arm |
|---|---|---|
| Load Bearing | Carries primary vehicle weight | Typically carries less load |
| Ball Joint Type | Load-bearing ball joint | Follower ball joint (on most designs) |
| Alignment Adjustment | Often provides caster/camber adjustment | Often provides camber adjustment |
| Replacement Frequency | More frequent | Less frequent |
6. Conclusion
Replacing a control arm assembly is a significant but achievable task for the prepared DIY mechanic. The key to success lies in proper preparation—having the right tools, a safe workspace with jack stands, penetrating oil for rusted fasteners, and manufacturer torque specifications for every bolt.
Final Checklist After Installation:
All bolts torqued to manufacturer specifications at normal ride height
Ball joint nuts tightened and cotter pins installed
Sway bar links properly attached and torqued
Wheel reinstalled and lug nuts torqued
Vehicle lowered and suspension settled (bounce the vehicle several times)
Critical Next Step: Wheel Alignment
After replacing any control arm, a professional wheel alignment is mandatory. Replacing control arms disturbs the suspension geometry, and even if you marked the alignment cams, a proper alignment is necessary to ensure correct camber, caster, and toe angles. Driving without an alignment will cause uneven tire wear, poor handling, and reduced fuel efficiency.
For those who prefer to leave suspension work to professionals, or for vehicles with significant rust or complex suspension designs, a qualified mechanic can perform the replacement quickly and correctly. Either way, using OEM-quality control arms with superior rubber-to-metal bonding ensures the repair delivers long-lasting performance and safety.
About GJBUSH
GJBUSH is a professional developer and manufacturer of rubber and metal bonding products with a legacy of excellence dating back to 1998. The company combines extensive research and development experience with advanced manufacturing capabilities, offering both forward development (designing from engineering specifications) and reverse development (analyzing customer samples to recreate drawings and material specifications). Whether customers provide samples or detailed engineering drawings, GJBUSH delivers precision-engineered solutions tailored to specific application requirements.
Operating from a state-of-the-art 27,000-square-meter facility that includes a dedicated NVH (Noise, Vibration, and Harshness) laboratory, GJBUSH maintains a fully integrated production chain. From the initial cutting of metal pipes to the final molding of finished products, every step is controlled in-house to ensure consistent quality and precise tolerances.
Adhering strictly to SGS IATF16949 production standards, GJBUSH guarantees OEM-level product quality across its extensive product range. While the company is renowned for automotive rubber shock-absorbing products—including bushings, top rubbers, and control arms—its expertise extends to agricultural machinery, home appliances, new energy vehicles, rail trains, construction equipment, and industrial applications.